
 After the excitement and exhaustion of our Waterloo Mega game over the weekend preceding the Waterloo 200th Anniversary, I wanted to spend the actual day itself quietly at home in quiet contemplation and marking the great day with a small solo game. Not as sad as it sounds - that night was club night and we would be playing a Waterloo scenario with Blucher rules, so I wouldn't be entirely without wargaming companionship on this auspicious day!
 |
| This time I got to wear my scarlet 'Anglo-Netherlands' T shirt! |
But for this daytime game - just me, myself and I - with the Long Haired Brigadier popping down stairs occasionally to check on my sanity and take the occasional photo of my erratic behaviour!
 |
| I'm pretty certain a 'scraggly hedge', to use Captain Siborne words, ran along the Ohain road... |
As with all human endeavour, there are pros and cons to either approaching a task within a large team of like minded fellows, or going it alone. As I hope my previous post has illustrated, collectively the Hall of Heroes mob staged a Waterloo game of epic proportions, never to be forgot by those who witnessed it. But, though I organised the project, I still had to sacrifice some of my views and research on the battle to achieve consensus on scenario, order of battle, and terrain, as did others involved in the planning process. I also had to join, and eventually lead, the French team, which would not have been my first choice!
 |
| View over a Baker rifle - a French Officer's life about to be cut short.... |
(In the event however, I think I learnt far more about the real campaign and battle, as opposed to the popular myths, in taking on the French perspective.) In return for letting these minor issues go, I shared a once in a lifetime epic experience in which the actual wargame was just a part of the entire weekend's social experience.

Whereas in a solo game, whilst none of these issues arise, obviously you lose the challenge of an independent, spontaneous opponent, since inevitably your handling of the 'opfor' army will conform to your preconceived idea of how they will fight!

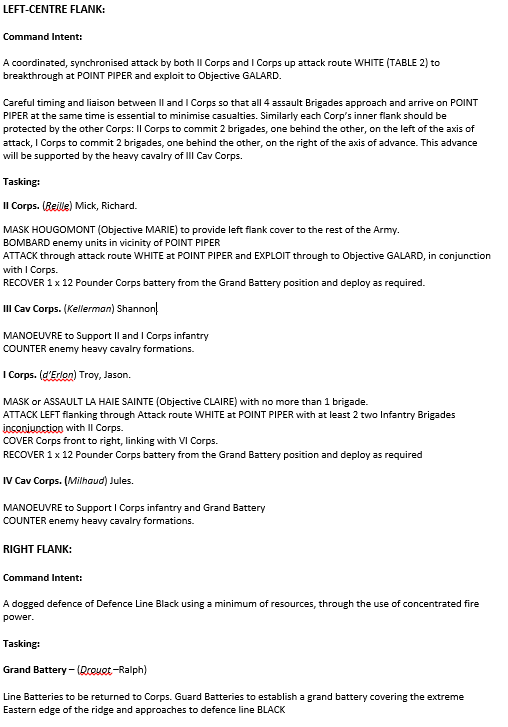
I decided instead to focus on the attack of D'Erlons' I Corps on Wellington's eastern half of the ridge.
Using the excellent maps and orbats in Adkin's Waterloo Companion, I set up an exact replica of the terrain and forces operating in this area.
Unfortunately, I do not have the exact models for the stout chaps of Best's Hanoverian Landwehr brigade, so these had to be represented by other units - another drawback when going it alone - these units were replicated for us in the Megagame by Rob's lovely Hanoverian army!
 |
| Front Rank Reinforcement Range 52nd Foot masquerading as the Osterode Landwehr Bn |
There was another limit to my efforts to achieve a historical representation....

Whilst, famously, D'Erlon, with his bitter Peninsula experience, decided to attack the ridge in divisional columns of battalions in line, I couldn't quite bring myself to do that!

The only unit I could bring myself to put in line was the right-most battalion from Bourgeois's Brigade of Quiot's division, which advanced to the left, and around, La Haie Sainte farmhouse. For my scenario, these troops, and the KGL troops facing them, were purely decorational.

 I don't have anything against line as a formation in particular, its just that with Black Powder rules, I find the best results for the French are to advance and assault in column, properly supported by skirmishers and artillery... These provide the firepower whilst the column has the resilience to shrug off the casualties from closing fire...
So we had a classic match up of line...

...versus column. The French would come on in 'the same old way' - it would remain to be seen if they would be despatched in the same old way...
 |
| Leading with the left - and the right!? |
So after a preliminary Allied Bombardment round, I stood on the French side of the table (no I didn't swap Blue and Scarlet T shirts for each move!) and ordered Donzelot's division on the French left and Duruttes' division on the right to charge the enemy facing them. I would retain Marcognet's centre division as a reserve, ready to exploit whichever of the two preliminary assaults seemed most promising.

That also left space for the Grand Battery to harass the Allied Centre, more in hope than expectation given the reverse slope, hedge, and the 'lie down' Albion Triumphant Vol 2 special rule which means that hits have to be re-rolled against troops lying down - a 6D6 followed by a 6D6!

So accordingly, on the French right flank Durutte led the 4th Division into a spirited attack on the Hanoverian Landwehr. C2 issues and some accurate closing fire by the Osterode Landwehrmanner resulted in a draw...no easy breakthrough at this end of the line...

Next to La Haie Sainte, its gallant defenders of the 2nd KGL Light Regiment tied up by feint attacks from the 105eme Ligne, a combination of enfilading fire from the Rifles in the sandpit, their supports further upslope, and the 2 artillery batteries meant that Donzelot's 2nd Division faced a withering fire as it ascended the ridge...

Hope flared up however when a lucky shot from the Grand Battery disordered the target of the attack, the 28th North Gloucesters - it meant that they could not now be ordered to 'stand up' and so if contacted by the French column, would automatically break!

General Picton was up to the moment however and deftly ordered the 79th Cameron Highlanders to advance forward to shield the 28th whilst their RSM 'tidied things up'

However, now fully exposed to the full weight of the frustrated gunners of the French Grand Battery, the Camerons were blasted from the forward slope. Yet their sacrifice had stablilised the line, and the Union Brigade had formed up ready to cause havoc amongst the 2nd Division...

However, since they were in a sensible column formation, they were able to form squares and withstand the onslaught, unlike on the day...and by this time Jaquinot had led his light horse across to the rescue...

Clearly it was time to commit the remaining, centre division of D'Erlon's Corps, the 3rd under Marcognet, to the left hand assault...

...since the lead elements Battalions of the first wave had reformed from their squares and were closing the British held ridge...

As before on the right flank, superb and devastating closing fire from the Gloucesters had disordered the initial assault, but this time properly supported, the first round of combat was a draw...

And then the weight of the French attack told, the Gloucesters were pushed back - the French were on the verge of breaking through...

And, Vive L'Empereur, they were indeed through at one point! But due to hand to hand casualties, and mounting musketry and artillery fire, all battalions were disordered, or shaken, or both...

According to most accounts, elements of D'Erlons Corps did succeed in breaking through the 'scraggly' hedgeline marking the Ohain road and the military ridge, just at the point when the Union Brigade caught them out. So I had succeeded in recreating that moment, whilst the Union Brigade were still busy slashing their way through Jacquinot's Lights elsewhere.
But neither division was in any position to exploit...

Despite the lack of a clear result, an enjoyable and historically satisfying way of spending the great day, and a further wargame amongst friends that evening to look forward to at my local uni club - of which more anon....


