
This Thursday at the Uni Peter, (left), organised a game of Rommel, the soon to be published WW2 Strategic Operational level game written by Sam Mustafa.

Under Caesar's (right) leadership we have been involved in the extensive playtesting of these watershed rules, so of course we believe they are the mutt's nuts, and fill a hole in the market that's been around for too long...

 They are novel in every way, and took some getting used to by a dinosaur like me, for example playing on a gridded surface. But actually, as shown above, the grid needn't be obtrusive, and saves a phenomenal amount of time in administering movement and measuring range. In fact I think these are the closest wargame rules I have ever experined in terms of spending the bulk of your time thinking tactically (well, operationally) than fussing over the actual rules! But lets get right to the sharp end, so if you wish to learn more about these rules than may I direct you to Sam's website, which includes a podcast all about the Rommel ruleset: Rommel Downloads Honour Podcast 10: How to play Rommel Peter organised a straightforward meeting encounter between a large force of 3 brigades a side. He thought this might be a bit packed on his 6 x 4 desert board, but we were all very keen to play, hence the large number of commands. The third brigade would arrive in the second round, accessing through an area predetermined by each team. All of the lovely models you see in this post are Peter's, the vehicles 1/285th GHQ, and the infantry 1/300th Adlers.
Each force consisted of 2 armoured brigade and an infantry brigade. The British armoured brigade sported an assortment of tanks current in 1942, Grants...

Stuarts...
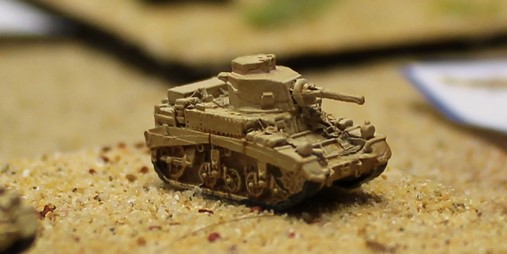
And the dreaded Sherman 75's...(Its not often you hear a mainly late war wargamer say that!)

The British team, seen here conferring mid battle, consisted (L-R) of David, Peter and Caesar.

The German armoured brigades had a back bone of Panzer IIIs, with a few Pz IIs and slight leavening of Panzer IVs to lend some weight:

I don't think Sam would want me to go into too much detail about game play at this stage, but the numbers in boxes represent the combat effectiveness of that unit, which represents a reinforced company of armour or about 2 companies of infantry. As you take losses the boxes are marked off, reducing your effectiveness...


My infantry brigade was fortunate to have 3 units from PanzerJaeger Abteilung 33 armed with Marder AT guns.


After the Brits had finished their cups of tea, we revealed our cards and let battle commence. I deployed my infantry brigade (white unit tags) in the centre of our table edge, holding the settlement that was our objective and the marshy ground and ridge that curved around to our left flank from it. Our plans was for Daniel (with dunkelgelb unit tags) to lead off on our right flank with his ontable armoured brigade, and then for Bryan's (bright yellow unit tags) armoured brigade to deploy to my left. My role would then be to keep the two armoured brigades linked up and protect their inner flanks.

Daniel duly issued the order 'Panzer Marsch' and he was off, launching an armoured attack on infantry ensconced on the ridgeline securing the British left flank...


Whilst Caesar on the British left fended off Daniels attack resolutely, committing the British reserve artillery, Peter demonstrated towards me in the centre with the British heavy armour...but I had confidence in my Marders:

Daniel's first attack out on the right flank was fended off, but he organised a follow with fresh forces...

And Bryan had by now come up and was able to shadow Dave's attempts to outflank us on our left flank:

The view from the British side - I think its fair to say the DAK had seized the initiative - clearly more tea was required:

All arms action continued hot over on our deep right flank...

But Daniel was steadily gaining the upper hand...whilst using up fresh units and tactics dice...(Without giving too much away, these allow you to pay for period and army selective traits that give you the advantage in combat)

In the centre, I was relieved that the Marders were able to fend off the heavy Shermans - had the British committed their armoured reserve too soon?

Then Daniel, rapidly running out of impetous, managed with one final effort to break through and past the British left flank, with only open desert between him and the objective...

Whilst at the same time Bryan massed his fresh armour from our left flank over towards the British centre...

And engaged the already worn down Shermans...

Also breaking through in the middle of the British line...

However, Peter had managed a breakthrough of his own into our now denuded left, so the game was declared a minor victory for the DAK!

A terrific game, authentically representing the frustrations and triumphs of large scale battle in WW2 on the table top...as much as any game can, anyway!
What a great looking game, wonderful close ups and terrain...
ReplyDeleteThanks Phil!
DeleteGreat to see you back online hard at work My Dearest Sparkles.
ReplyDeleteSalute
von Peter himself
Thanks your Vonship!
DeleteI second that, I was worried about you, it had been awhile between posts. Interesting game. Our group plays a lot of the ancients rules To the Strongest which uses a grid and we love how it eliminates rulers and arguments about distances/moves.
ReplyDeleteThanks Joseph - Very kind! Yes I'm now very happy with the grid and the time it saves!
ReplyDeleteThis comment has been removed by the author.
ReplyDelete